

This guide shows beginner home cooks how to use an electric roasting pan to prepare meat, poultry, vegetables, or other oven-style dishes. You will learn how to set up the pan, choose a temperature, check food for doneness, and clean the appliance after cooking. Setup and cleanup take about 20-30 minutes; cooking time depends on the food and recipe.

Get home appliances delivered free with Prime
- Fast, free delivery on millions of items
- Prime Video, Amazon Music and more included
- Member-only deals all year

28 Quart Electric Roaster Oven with Self-Basting Lid
- ✔ Capacity: 28 quarts
- ✔ Temperature range: 150–450°F
- ✔ Wattage: 1450 watts

SUNVIVI 24-Quart Electric Roaster Oven with 3 Buffet Trays
- ✔ Capacity: 24 quarts
- ✔ Turkey capacity: Up to 28 lbs
- ✔ Temperature range: 150–450°F
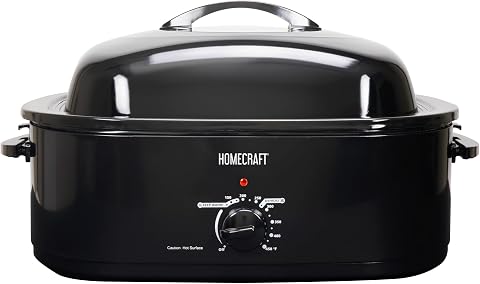
Homecraft 18-Quart Electric Roaster Oven
- ✔ Capacity: 18 quarts
- ✔ Maximum temperature: 450°F
- ✔ Control: Full-range dial; listing also states three settings
Difficulty: Beginner | Time: 20-30 minutes setup and cleanup, plus cooking time
What You’ll Need
Tools & Materials:
- Electric roasting pan with its lid and removable cooking pan
- Stable, heat-resistant surface near a grounded electrical outlet
- Food thermometer
- Oven mitts
- Dish soap, a soft sponge, and clean towels
Knowledge:
- Basic kitchen safety
- How to read a recipe and use a food thermometer
Read the appliance manual before first use. Roasting pans vary in capacity, controls, and whether the cooking pan can be immersed or washed in a dishwasher. Follow the manual for cleaning and operating details. Use a recipe written for a conventional oven as a starting point, but check the food early because heat and cooking times can vary by model.
28 Quart Electric Roaster Oven with Self-Basting Lid
For buyers who want one appliance to handle a large roast and offer some visibility during cooking, the Kiss the Water 28-quart roaster is the strongest all-around fit in this group. Its self-basting lid is designed to recirculate moisture, and the viewing window lets us check on food without lifting the lid and letting heat escape. That combination gives it a more monitoring-oriented setup than the Homecraft, whose listed package includes a high-dome lid but no viewing window.The temperature range of 150–450°F, plus defrost and warm functions, gives this model room for more than roasting. Its removable pan and rack also make serving and cleanup more manageable than a fixed interior would. Compared with SUNVIVI, it puts the emphasis on cooking visibility and capacity rather than accessories for keeping sides warm.Its main compromise is physical: the listed 27-by-22-inch footprint is substantial and could be awkward to store between holiday meals. The knob control is straightforward, but buyers seeking precise digital adjustments will find less control detail here. We would choose it for capacity and lid features, provided there is a realistic place to use and store it.
Pros:
- 28-quart capacity offers the most room among these three models.
- Viewing window supports monitoring without opening the lid.
- Self-basting lid is designed to circulate moisture during cooking.
- Removable pan and rack support easier lifting and cleanup.
Cons:
- Listed dimensions make it the bulkiest footprint in the comparison.
- Knob controls provide less precision than a digital interface.
Best for: Cooks who regularly prepare large roasts and want a viewing window, self-basting lid, and warm or defrost functions.
Not ideal for: Anyone with limited counter or cabinet space, or who prioritizes digital temperature precision.
Bottom line: Choose the Kiss the Water when generous capacity and a windowed self-basting lid matter more than compact storage or digital controls.
“Choose the Kiss the Water when generous capacity and a windowed self-basting lid matter more than compact storage or digital controls.”
SUNVIVI 24-Quart Electric Roaster Oven with 3 Buffet Trays
The SUNVIVI is the lineup’s clearest choice for cooks who need to coordinate a main dish with several warm sides. Its three buffet trays and divider pan extend the appliance’s role beyond roasting, while the 24-quart roaster is described as fitting a turkey up to 28 pounds. That gives it more serving flexibility than the Kiss the Water, which concentrates on a larger roasting cavity and viewing window.Like the Kiss the Water, SUNVIVI lists a 150–450°F range and a self-basting lid. The removable enamel pan and rack provide a familiar roasting setup, and the trays and pan are described as dishwasher safe. For a gathering where food needs to stay warm after cooking, those accessories can reduce the need for separate serving equipment.The tradeoff is that the buffet setup competes with the roasting space: trays and divider pan take up interior room when installed. Its 25-inch width also calls for a generous counter or storage area. We would pick SUNVIVI over Homecraft when keeping sides warm is central; for uncomplicated roasting without serving accessories, Homecraft is the less involved package.
Pros:
- Three buffet trays support warming and serving multiple sides.
- Listed to fit a whole turkey up to 28 pounds.
- Self-basting lid and adjustable 150–450°F control add cooking flexibility.
- Removable pan and buffet trays are described as dishwasher safe.
Cons:
- Buffet trays and divider pan occupy interior space during roasting.
- Its 25-inch width may be difficult to accommodate in smaller kitchens.
Best for: Hosts who want a roaster that can also keep several side dishes warm for a meal.
Not ideal for: Buyers who want the maximum open roasting space or have limited storage and counter width.
Bottom line: Pick SUNVIVI when warming and serving sides is worth giving up some interior room and storage convenience.
“Pick SUNVIVI when warming and serving sides is worth giving up some interior room and storage convenience.”
Homecraft 18-Quart Electric Roaster Oven
Homecraft keeps the package focused: an 18-quart removable enamel pot, stainless-steel lift-out rack, and high-dome lid cover the essentials for roasting, slow cooking, thawing, or warming. It is the smallest-capacity model in this comparison, which makes it the more sensible starting point for households that do not need the 24- or 28-quart cavities. The smaller stated width than SUNVIVI may also be easier to place, though its listed depth still merits a measurement before buying.Its temperature control is described as a full-range dial reaching 450°F, offering a familiar, simple interface. Compared with Kiss the Water, it lacks a viewing window and self-basting feature; compared with SUNVIVI, it does not include buffet trays for side dishes. In exchange, its included parts stay focused on lifting and cooking the main dish rather than supporting a broader serving setup.There is one specification wrinkle to keep in mind: the listing also says there are three settings, which does not clearly match the full-range dial description. Buyers who need finely specified temperature steps should resolve that ambiguity before relying on it. The 18-quart capacity may also be limiting for a large gathering. We see Homecraft as the practical pick for simpler roasting, not the most versatile choice for entertaining.
Pros:
- Removable enamel pot and lift-out rack cover core roasting needs.
- High-dome lid and cool-touch handles are included.
- Temperature control is listed up to 450°F.
- Smaller capacity than the other picks can suit more modest meals.
Cons:
- Listing is unclear about whether temperature control is full-range or limited to three settings.
- No viewing window, self-basting lid, or buffet trays are listed.
- 18-quart capacity may be insufficient for larger gatherings.
Best for: Households seeking an uncomplicated roaster with a removable pot and rack, without buffet-serving accessories.
Not ideal for: Cooks needing the largest turkey capacity, lid visibility, self-basting, or clear detail about temperature increments.
Bottom line: Homecraft is the straightforward choice for smaller roasting needs if its temperature-control details meet your expectations.
“Homecraft is the straightforward choice for smaller roasting needs if its temperature-control details meet your expectations.”
As an Amazon Associate we earn from qualifying purchases.
Before You Start
Place the appliance on a level, dry, heat-resistant surface with open space around it. Keep the cord away from the edge of the counter, hot surfaces, and sinks. Do not use an extension cord unless the manual specifically permits it. Never immerse the electrical base, thermostat, or cord in water. Keep children away from the hot pan and lid, and lift the lid away from your face to avoid steam.
Check that the food fits with the lid closed and does not touch the heating element or sides. Thaw frozen meat in the refrigerator before cooking unless the recipe and appliance manual say otherwise. Do not use the roasting pan as a substitute for a pressure cooker or slow cooker.
Step-by-Step Instructions
Step 1: Inspect and assemble the pan
Unplug the appliance and set the removable cooking pan into the heating base. Check that the pan, lid, and cord are clean and undamaged. Fit the lid in place, then confirm that the thermostat control is set to off before plugging the unit into the outlet.
Tip:If the appliance is new, remove packing materials and wash only the parts the manual identifies as washable. Dry every part fully before assembly.
Check: The cooking pan sits securely in the base, the lid fits, and the cord and controls show no damage.
Step 2: Preheat the roasting pan
Set the temperature to the level specified by your recipe or appliance manual. Let the empty pan preheat with the lid on, if the manual directs you to do so. Preheating time varies by model; use the indicator light or manual rather than assuming the pan is ready after a fixed number of minutes.
Tip:Some models are designed to start with food inside and should not be preheated empty. Follow the appliance instructions for your model.
Check: The preheat indicator signals readiness, or the manual’s stated preheating procedure is complete.
Step 3: Prepare and place the food
Season and prepare the food according to your recipe. Add any required rack, liquid, or vegetables to the cooking pan. Arrange food with space around it so hot air can circulate, and keep it below the lid. Place large cuts with the thicker portion positioned for even cooking, as the recipe directs.
Tip:Do not overfill the pan. Crowded food can cook unevenly, and food touching the lid may interfere with circulation or become too hot on top.
Check: The food rests in the pan without blocking the lid, and the lid closes fully.
Step 4: Set the cooking temperature and cover
Set the thermostat to the recipe’s cooking temperature. Put the lid on and keep it closed while the food cooks. If you adapt an oven recipe, begin checking before its stated oven time is finished; electric roasters differ in heat distribution and cooking speed.
Tip:Opening the lid releases heat and can lengthen cooking time. Check only when needed, and close the lid promptly.
Check: The temperature control is set, the lid is seated, and the appliance remains on a stable surface.
Step 5: Check the food for doneness
When the recipe’s first check time arrives, lift the lid away from your face using oven mitts. Insert a food thermometer into the thickest part of the food without touching bone, the pan, or a large pocket of fat. Check more than one spot in a large roast or poultry item, then compare the readings with current food safety guidance for that food.
Tip:Color and cooking time alone do not reliably show that meat or poultry is safe to eat. Use a clean thermometer and wash it after checking raw or partially cooked food.
Check: The thermometer reading meets the recommended safe temperature, and the food has the texture and appearance expected by the recipe.
Step 6: Rest and serve the food
Turn the thermostat off and unplug the appliance when cooking is complete. Transfer the food with clean utensils to a serving platter or cutting board, then let it rest for the time your recipe specifies. Use oven mitts when handling the lid or cooking pan, since both can remain hot after unplugging.
Tip:Do not leave cooked food at room temperature for more than two hours, or one hour when the room is above 90°F (32°C). Refrigerate leftovers promptly in shallow containers.
Check: The food is served after resting, and any leftovers are stored promptly in the refrigerator.
Step 7: Cool and clean the appliance
Unplug the roaster and let it cool completely. Remove the cooking pan and wash it, the lid, and rack according to the manual. Wipe the heating base with a damp cloth only if the manual permits it; keep water away from electrical parts. Dry all washable parts before reassembly or storage.
Tip:Abrasive pads and harsh cleaners can damage nonstick coatings. Use a soft sponge and mild dish soap unless the manufacturer specifies another method.
Check: The appliance is unplugged, all parts are cool and clean, and the electrical base and cord are dry.
Common Mistakes to Avoid
- Using the pan without checking the model’s instructions. — Read the manual for preheating, temperature settings, cookware limits, and which parts can be immersed or placed in a dishwasher.
- Overfilling the pan or letting food touch the lid. — Choose a roast or recipe that fits with clearance around it and enough space for the lid to close securely.
- Relying on the recipe’s time or the food’s color to judge doneness. — Check with a food thermometer in the thickest section and follow safe-temperature guidance for the food.
- Pouring water over the electrical base during cleanup. — Unplug and cool the appliance first, then wipe the base with a damp cloth only as allowed by the manual.
Troubleshooting
Problem: The roaster does not heat.
Solution:
Turn the control off, check that the plug is fully seated in a working outlet, and confirm that the cooking pan is placed correctly. Check the manual for reset or indicator-light instructions. Stop using the appliance if the cord, plug, or base is damaged.
Problem: The food is cooking unevenly.
Solution:
Check that the pan is level, the lid is fully seated, and the food is not crowded. Rotate or rearrange food only if the recipe and manual allow it, then continue cooking and check the temperature in several areas.
Problem: The outside is browning before the center is done.
Solution:
Lower the temperature slightly if the recipe and manual allow, keep the lid on, and continue cooking until the thickest part reaches a safe temperature. Avoid cutting into the food repeatedly, which releases juices and heat.
Problem: Steam escapes around the lid or the lid will not sit flat.
Solution:
Turn off and unplug the unit before adjusting it. Check that the food is below the rim, the pan is seated, and no utensil or food is caught under the lid. Replace a warped or damaged lid through the manufacturer.
What Success Looks Like
The food is fully cooked to a safe internal temperature, the appliance has been switched off and unplugged, and the cleaned removable parts are dry. The heating base and cord remain dry and undamaged. Leftovers are refrigerated promptly.
Next Steps
Store the appliance clean and dry with its cord loosely arranged, following the manufacturer’s storage instructions. Keep the manual with the roaster so you can check model-specific temperatures and care details next time. For another meal, choose a recipe that fits the pan’s capacity and begin checking doneness before the recipe’s final cooking time.
Frequently Asked Questions
Can I use an electric roasting pan instead of an oven?
For many roasting and baking recipes, yes, if the pan’s capacity and manual support the dish. Cooking results and timing can differ from a conventional oven, so check doneness early and use a thermometer where appropriate.
Should I add water to the bottom of the pan?
Add water or other liquid only when your recipe or appliance manual calls for it. Liquid can help create steam or prevent drippings from scorching, but too much can affect browning and cooking.
Can I put the cooking pan in the dishwasher?
Check the manual for your specific model. Some removable pans are dishwasher safe, while others require hand washing; the electrical base is not dishwasher safe.
How do I adapt an oven recipe?
Use the recipe temperature as a starting point only if the manual supports it. Keep the lid closed and start checking before the recipe’s stated oven cooking time ends. Rely on a thermometer and the recipe’s doneness cues.


