
TL;DR
Moving your rig into a closet or small space can drastically cut noise—if you treat it right. Placement, sealing gaps, and proper ventilation matter more than just adding foam. It’s about controlling reflections, blocking leaks, and managing heat, not just sound absorption.
Imagine turning a noisy, cluttered closet into a silence-filled sanctuary for recording or AI work. It sounds almost too simple. But the secret isn’t just adding foam or acoustic panels. It’s about smart placement, sealing gaps, and controlling heat. For more tips on creating an optimal environment, see rig in the closet setup.
Most noise comes from sound traveling through the air or vibrating through surfaces. Understanding soundproofing techniques can help you identify the best ways to block external noise. The best fix? Put distance between you and the source. Use your closet as a noise shield, but don’t forget — heat build-up can turn this solution into a fire hazard if you don’t ventilate properly. This guide shows you how to make a closet work for you, whether for audio, video, or AI workloads.
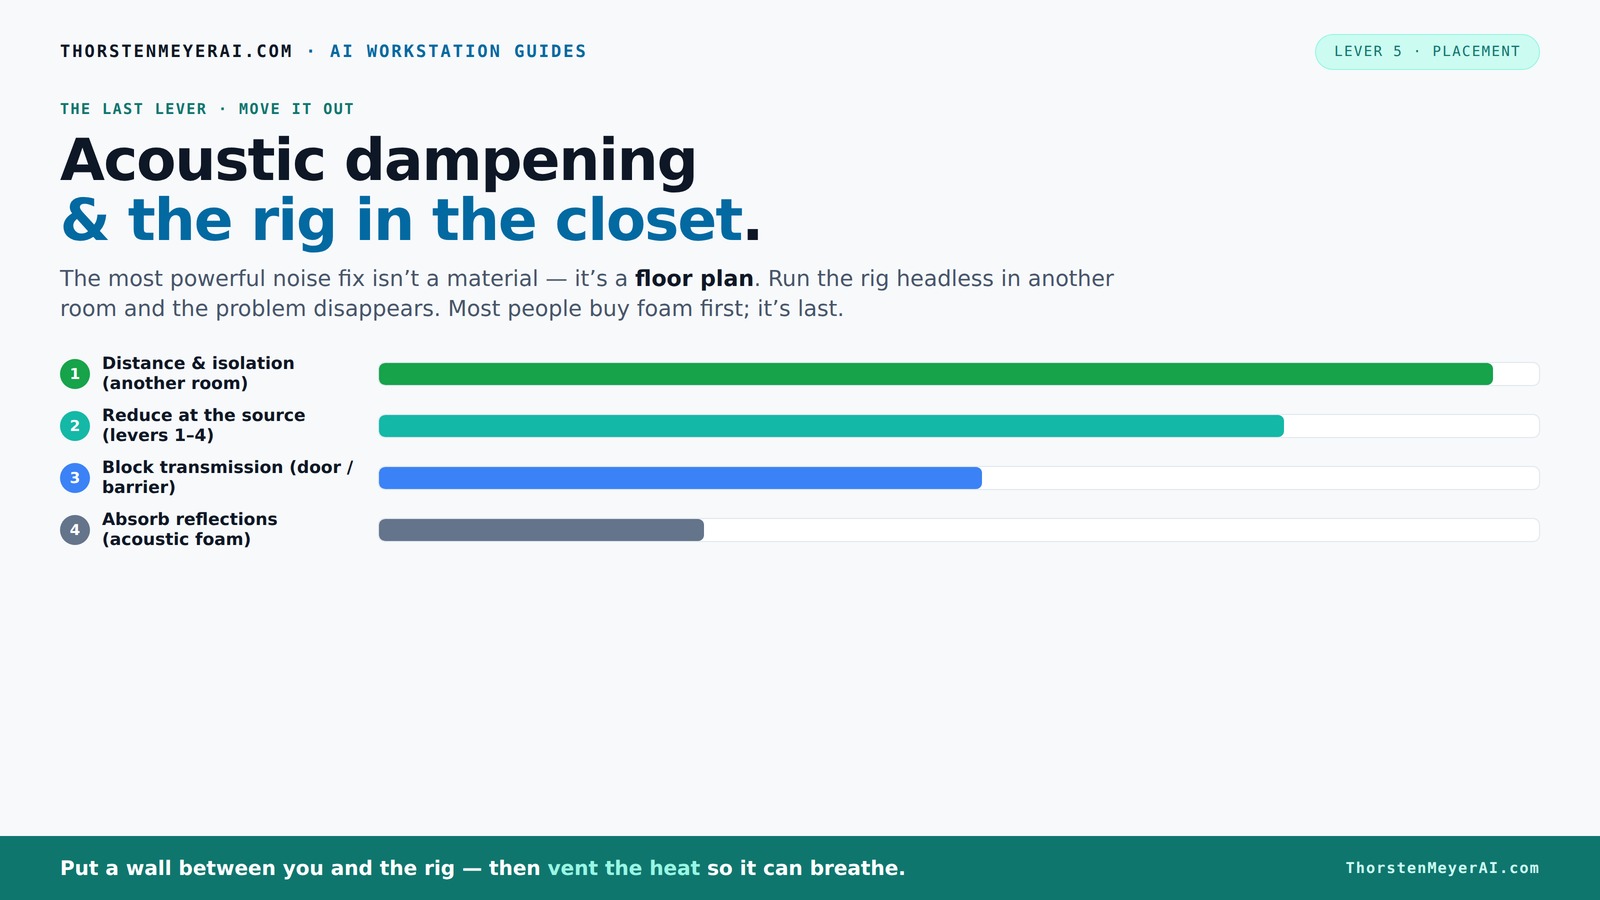
Acoustic dampening
& the rig in the closet.
The most powerful noise fix isn’t a material — it’s a floor plan. A rig you can’t hear because it’s in another room beats any amount of foam. Tap the approaches in Part 1 to see what actually works.
(another room)
(levers 1–4)
(door / barrier)
(acoustic foam)
Contain the noise, not the heat
Key Takeaways
- Sealing gaps around your closet door can cut noise leaks by over 70%.
- Placement of acoustic panels at first reflection points yields the biggest sound quality improvements.
- Moving your rig into a closet works best when paired with active ventilation to prevent overheating.
- Bass traps in the corners make a huge difference for low-frequency muddiness in small spaces.
- Don’t rely solely on foam — combine sealing, placement, and ventilation for best results.

24 Pack Black 12 x 12 x 2 Inches Pyramid Designed Acoustic Foam Panels, Sound Proof Foam Panels for Walls, High Density and Flame-Retardant Acoustic Panels, Sound Panels for Recording and Home Studio
Exceptional Sound Absorption:These pyramid acoustic panels are engineered to effectively absorb sound waves, reducing echo and reverberation. With...
As an affiliate, we earn on qualifying purchases.
As an affiliate, we earn on qualifying purchases.
What 'Acoustic Dampening' Really Means in a Closet Setup
Acoustic dampening in a closet context means reducing echoes, reflections, and some noise leaks. It’s about softening the sound that bounces around inside the small space, not blocking noise from escaping or entering.
Think of it like muffling a drum — you can quiet the echo but not stop the drum from being heard outside if the shell isn’t sealed. Learn more about acoustic dampening techniques. Inside a closet, dense panels, blankets, and foam absorb sound waves, making recordings clearer and reflections less harsh.
But if your concern is outside noise—like neighbors or street traffic—dampening alone won’t cut it. That’s soundproofing, which involves sealing gaps and adding mass.
Understanding this distinction helps you decide where to focus your efforts. Dampening improves the quality of your recordings by controlling internal reflections, but it won’t prevent external noise from seeping in. Conversely, soundproofing is about stopping outside noise from entering, which often requires more extensive modifications like adding mass or sealing all leaks. This differentiation is crucial because investing in dampening alone can give a false sense of a quiet space, while neglecting proper sealing can leave your setup vulnerable to outside noise.
rig in closet soundproof enclosure
As an affiliate, we earn on qualifying purchases.
As an affiliate, we earn on qualifying purchases.
Why Placement of Panels in a Small Closet Matters More Than You Think
Where you put your acoustic panels can make or break your space. For detailed placement strategies, visit placement tips. The biggest gains come from treating the first reflection points — spots where sound bounces directly from source to wall and back.
For example, if you’re recording vocals in a closet, place panels at ear level on the side walls facing the mic. Use the mirror trick: sit in your usual spot, hold a mirror against the wall, and mark where the speaker or microphone’s reflection hits. Those are your prime panel locations.
In a tiny space, covering 20–40% of the walls with absorption can significantly reduce echo and boxiness. It’s about strategic placement, not just coverage.
But why does this matter so much? Because in small spaces, sound reflections can quickly build up, creating a muddy, boxy sound that diminishes clarity. Proper placement ensures that the sound waves are absorbed at the points where they would otherwise bounce back into your ears, improving clarity and reducing fatigue during long sessions. The tradeoff is that over-absorbing in certain areas can make the room sound unnaturally dead, so strategic placement involves balancing absorption with some reflective surfaces to maintain liveliness.

VEVOR Portable Vocal Booth, 6.56 ft Height, Portable Recording Studio with Travel Bag, Mobile Tablet Stand, Thickened Soundproofing, Sound Isolation Booth for Echo-Free Vocals, Podcasts, Voiceovers
Say Goodbye to Echoes: Built with durable Oxford cloth and acoustic padding, this recording booth for the home...
As an affiliate, we earn on qualifying purchases.
As an affiliate, we earn on qualifying purchases.
How to Seal a Closet Door for Better Noise Reduction
Gaps around your closet door are like open windows for noise. Sealing them properly is crucial; see how to seal a closet door effectively. Sealing them tight makes a huge difference. Use weatherstripping or door sweeps to block sound leaks.
For example, a thick foam weatherstrip around the door frame can cut noise escape by 50%. Add a draft stopper or blanket over the door if needed. For larger gaps, consider sealing cracks with caulk or installing a door seal kit.
Remember: even small gaps matter. Sealing improves both soundproofing and internal acoustics, preventing sound from leaking out and reducing echo inside.
Why is this so effective? Because sound leaks are often the biggest weak point in a closet setup. Gaps allow high and low frequencies to escape or enter, making your space less effective at isolating sound. Sealing these gaps not only reduces external noise intrusion but also prevents internal sound from escaping, which is especially critical if you are recording sensitive audio. The tradeoff is that over-sealing can make the room feel claustrophobic or less ventilated, so combining sealing with proper ventilation is key for a balanced setup.

22 Pack Self-Adhesive Sound Proof Foam Panels for Walls 12"x12"x0.4" Fabric
Superior Noise Reduction & Echo Cancellation - Tired of background noise and poor acoustics? Our soundproof wall panels...
As an affiliate, we earn on qualifying purchases.
As an affiliate, we earn on qualifying purchases.
Frequently Asked Questions
Do I need acoustic treatment or soundproofing?
It depends on your goal. Acoustic treatment softens reflections inside the space, making recordings clearer. Soundproofing blocks noise from escaping or entering. For a closet rig, sealing gaps and adding absorption usually suffices unless external noise is a big problem.Will foam panels block noise from a closet?
No. Foam panels absorb sound reflections inside the closet but don’t prevent outside noise from leaking in or sound from escaping. For blocking outside noise, sealing gaps and adding mass is necessary.Where should I place panels in a closet or small studio?
Focus on first reflection points—places where sound bounces directly from source to wall. Use the mirror trick to find these spots. Cover 20–40% of these surfaces with absorption for best results.How many panels do I need for a vocal booth or closet rig?
Start with enough to cover about 20–40% of the walls, especially the side walls and ceiling. The exact number depends on your space size and goals, but more coverage improves clarity.Should I treat the walls, ceiling, door, or floor first?
Prioritize the first reflection points on walls and ceiling, then seal the door and gaps. Floor treatment is less critical unless you notice footstep noise or echoes bouncing from below.Conclusion
Turning a closet into a quiet, professional workspace is about smarter placement, sealing, and ventilation, not just slapping on foam. For more comprehensive advice, check out home appliances and tech guides. When you treat the space where sound bounces and leaks, you cut noise effectively and keep your equipment cool.
Imagine a tiny room that’s silent enough for voiceovers or AI inference—without the roar of fans or the echo of a closet. That’s the power of good placement and proper treatment. Your next step? Focus on sealing gaps and creating a flow of air. Silence, then success.